WDC Node.js Proxy with OAuth Tutorial
Important: Tableau Web Data Connector 2.0 (this version) is being deprecated at Tableau 2023.1 and eventually retired. We will still support WDC 2.0 until its last compatible version of Tableau (Tableau 2022.4) goes End of Life and is no longer supported.
For information about Tableau Web Data Connector 3.0, see the WDC 3.0 documentation.
This tutorial builds on what you learned about web data connectors in the Basic tutorial. Ensure that you understand the concepts in the basic tutorial before you continue.
By the end of this tutorial, you’ll have a working WDC that connects to Foursquare and downloads data for sites that you “liked” in Foursquare. This is a multi-step tutorial on how to use OAuth with a Tableau web data connector. Here is a list of all the steps:
- Introduction and Overview
- Create a Foursquare App
- Install and configure the web server
- Create the UI for Signing In
- Add Code for OAuth Sign-In
- Test OAuth Sign-In
- Get Columns and Data
- Manage Credentials
- Test the Connector in the Simulator
- Test the Connector in Tableau
Note: To see all the code for the tutorial, see Complete Code Listing.
Step 1 Introduction and Overview
In this part of the tutorial, you’ll learn these things:
-
The tutorial scenario. This section describes the web data connector that you’ll build.
-
Prerequisites. What you’ll need, and what we assume you already know about web data connectors.
-
What is OAuth? If you’re new to OAuth, this section provides a quick overview.
-
Which OAuth grant should I use? There are two basic ways to work with OAuth: One uses the implicit grant and client-side flow, and the other uses the authorization code grant and server-side flow. This section provides a brief overview of each and when to use them.
The tutorial scenario
If you really want to skip all of this and go straight to the source code, look for the foursquare files in the
Examples\OAuthProxyExample directory. However, you’ll get a lot more out of this if you build it yourself following along with this tutorial.
Note: The connector that we’ll create in this tutorial (foursquareWDC) has a different name than the same
connector in the Examples\OAuthProxyExample directory (foursquare). This is to minimize the chances of overwriting
the existing sample. In this tutorial, you copy some of the files over from the existing sample. These are files that you need to set up the web server. You can adapt this process to create and test new connectors that also require OAuth support.
In this tutorial, you’ll build a web data connector that gets data from Foursquare (http://foursquare.com). Foursquare is an app that allows users to search for local services, such as restaurants or attractions. Foursquare also exposes an API that developers can use to perform many of the functions that the app has. Foursquare is one of many sites that use OAuth with their APIs. Others are Facebook, Yelp, Tumblr, Twitter, Spotify, Etsy, and many more.
For this tutorial, you’ll create a web data connector that calls the
Foursquare
venuelikes
endpoint, which returns a list of venues that a specific user has
“Liked” in Foursquare. When you call the venuelikes endpoint, you must
include an OAuth access token. The token tells Foursquare that the user
has allowed your app—namely, the web data connector—to access the user’s
personal information on Foursquare.
Note: This tutorial illustrates how to use OAuth 2.0.
Prerequisites
To run this tutorial, you need the following:
-
Basic familiarity with JavaScript.
-
The Web Data Connector SDK installed on your computer.
-
Familiarity with the concepts and web data connector example in the Basic tutorial.
-
A web server running locally on your computer and listening on port 3333. In this tutorial, you will use Node.js and Express framework to create a simple web server that will handle the server-side authentication. You can adapt this model to create and test new connectors. We will cover installing and configuring the web server in this tutorial.
What is OAuth and how does it work?
This section provides some basic information about OAuth for those who are not familiar with it. OAuth is an authentication protocol that allows an application (in our case, a web data connector) to request specific resources from a resource provider (Foursquare) on behalf of a specific resource owner (the user who signs in to Foursquare). This is a more secure and usable alternative to the application asking the user directly for their Foursquare username and password.
To use OAuth, an application must be registered with the OAuth resource provider. For example, in this tutorial, you register your application with Foursquare. (If you were using a different OAuth provider, you would register your application with that provider.) The provider assigns a client ID to identify the application and a client secret that is known only by the application and the OAuth provider and is used to authorize the application to make requests on behalf of the user. When the application contacts the OAuth provider, the application passes the client ID to identify itself. The exact process for registering your application differs for each provider, and is typically explained in the provider’s documentation for how to use their API.
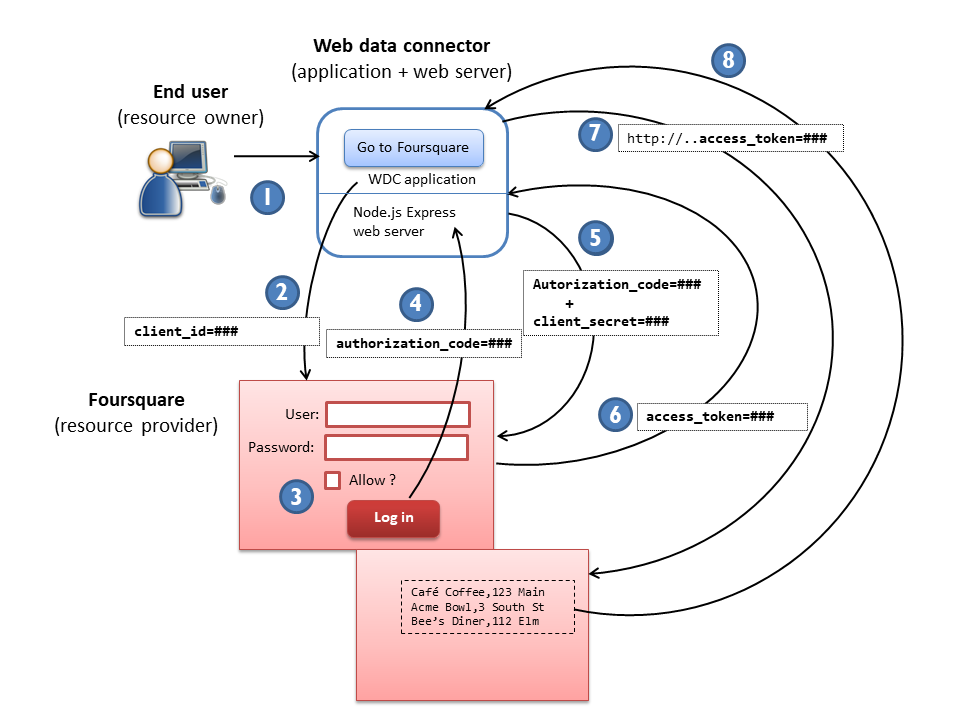
The following diagram illustrates an example OAuth flow, which is the flow you will build. The steps following the diagram describe the steps in the flow.
-
To connect to data, the end user loads the web data connector in Tableau.
-
The connector displays a button that prompts the user to go to Foursquare to sign in. When the user clicks the button, the connector redirects the user to Foursquare to sign in. (The redirect URL includes the client ID for your connector.)
-
On the Foursquare site, the user signs in and grants permission to the connector to access the user’s personal information.
-
Foursquare redirects the user back to the connector. As part of the URL that redirects the user back to the connector, Foursquare includes an authorization code.
-
The HTTP server we setup with Node.js Express accepts the authorization code and issues a request to Foursquare for an access token. The request includes the client ID and the client secret, a unique identifier that only the server and the Foursquare OAuth provider have knowledge of. The client secret is to ensure that some other application can’t impersonate your connector.
-
Foursquare verifies the authorization code and client secret and returns an access token.
-
The connector includes the access token when it makes requests to Foursquare endpoints. When Foursquare gets the requests, it recognizes that the call is on behalf of the user.
-
Foursquare returns the requested information for the user represented by the access token.
Which OAuth grant type should I use?
Applications can use OAuth using one of several grant types. A grant type refers to the way an application goes about getting an access token after a user has authorized the application. Two common ones and the ones described here are the authorization code grant and the implicit grant. The grant type you choose determines the type of authorization flow you use.
With the authorization code grant, the application requests an authorization code when the user signs in, which is then exchanged for an access token. The authorization code grant can be referred to as server-side flow, as the authorization flow goes through the application’s back end (or server-side) code, which handles exchanging the authorization code and the client secret for the access token.
When you use the implicit grant, the application requests the access token, which is returned when the user gives the application permission. This type of grant could be referred to as client-side flow, as the JavaScript that runs in the browser makes the OAuth calls and handles the access token.
The primary motivation for using authorization code grant and the server-side flow is to increase security. In client-side flow, all the information required in order to get an access token is on the client—that is, in JavaScript code. This makes the information visible to anyone who can read that JavaScript code. In the server-side flow, the server keeps the client secret that’s assigned to the app, and the secret is used to get the access token.
Which should you use? A rule of thumb is that if you’re calling endpoints that require your client secret, you should use the authorization code grant and the server-side flow. The client secret should be kept secure, and the implicit grant and client-side flow potentially exposes the secret. In the server-side flow, the client secret can be kept more secure on the server. We use the authorization code grant and server-side flow in this tutorial.
However, if you’re not calling endpoints that require the client secret, it’s generally easier to implement the client-side flow.
Step 2 Create a Foursquare App
In this part of the tutorial, you’ll create an account with Foursquare (the OAuth provider) and register your app. You’ll get back a client ID and client secret that you’ll need for making calls to Foursquare later.
Register your app with Foursquare
Before you create the web data connector, you must register your Foursquare application (the web data connector) on the Foursquare developer site. When you’re done, you’ll have a client ID that you use when you communicate with Foursquare and that lets Foursquare know who is making requests.
-
Go to the Foursquare.com site. If you have a Foursquare developer account, sign in. Otherwise, sign up for a new account.
-
Go to the My Apps page (https://foursquare.com/developers/apps) on the Foursquare developer website.{:target=”_blank”}
-
Click the Create a new app button.
-
Fill in the Your app name, Download/welcome page url, and Redirect URI(s) boxes.
You can use any values you want for the application name and welcome page URL. For the Redirect URI box, enter the following:
http://localhost:3333/redirectYou will use this value later on when you make a call to the Foursquare OAuth service.
-
Click Save Changes.
Foursquare displays a client ID and a client secret.
-
Copy the client ID and client secret and keep them in a secure location.
Note: For this tutorial, you need the client ID and the client secret. The client ID is used for the initial request for authorization. The client secret is used by the local web server to complete the authorization and to obtain the access token. The client secret must be kept secure and away from public view. In this tutorial, we use the client secret on our web server and not in our Foursquare WDC application, where the JavaScript code is potentially accessible.
“Like” some venues
If you’re new to Foursquare, you don’t have any “Liked” venues. To make sure you have some data to work with later, do this.
-
Go to the Foursquare.com site and sign in.
-
Go to the City Guide, and search for venues and display the listing for a venue that you like.
-
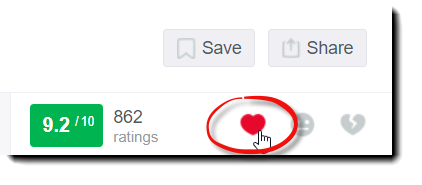
Click the “Like” icon for the venue near the top of the listing.
-
Repeat steps 2 and 3 a few times until you have a selection of “Liked” venues to test later.
Next
In the next part of the tutorial, you’ll create the folders on your computer where you will host the connector and you will configure the Node.js web server.
Step 3 Install and configure the web server
In this part of the tutorial, you will create a new directory for your web data connector. You will also copy the Node.js files over from the Examples\OAuthProxyExampledirectory and then configure the web server to handle the server side OAuth flow, using the client id and client secret you obtained from Foursquare.
-
Create a directory for this foursquare web data connector under the
Examplesfolder (for example,Examples\FoursquareWDC). -
Copy the following files:
app.js,config.js, andpackage.jsonfrom theExamples\OAuthProxyExamplefolder to the folder you just created in step 1. -
After you copy the three files, create a new folder in your directory called
public. You will use this folder later for your connector’s public-facing web page (for example,Examples\FoursquareWDC\public). -
Open a Command or shell window and navigate to the directory where you copied the files (
Examples\FoursquareWDC). Install the express server with the following the following command: npm install
The command will install all the files you need to run the web server. -
Configure the web server. Edit the
config.jsfile in the directory you created and add information about your app. Use http://localhost for theHOSTPATHand the 3333 as thePORT. TheREDIRECT_PATHshould be /redirect. Your file should look like the following. ReplaceYOUR_CLIENT_IDandYOUR CLIENT_SECRETwith the actual values from Foursquare you saved earlier when you registered your app.
// The necessary configuration for your server
// Contains credentials for your Foursquare application
// And the new redirect path for the OAuth flow
module.exports = {
 'HOSTPATH': 'http://localhost',
 'PORT': 3333,
 'CLIENT_ID':  'YOUR_CLIENT_ID',
 'CLIENT_SECRET': 'YOUR_CLIENT_SECRET',
 'REDIRECT_PATH': '/redirect'
};
The information you entered in the config.js file will be used to get the access token from Foursquare. The authorization flow is handled in the web server that you configured, so that the client secret is inaccessible from the public facing web pages that you will create in the next step.
Step 4 Create the UI for Signing In
In this part of the tutorial, you create an HTML page that contains markup for the UI that lets the user sign in to Foursquare. The HTML page renders the following:
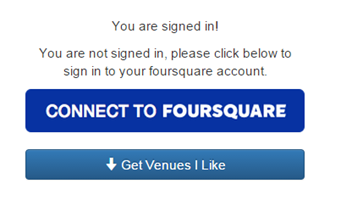
You also add JavaScript code that toggles text in the page (“You are signed in” or “You are not signed in”), depending on whether the user is signed in.
Get the button graphic
The page we are creating uses a graphic for the Connect to Foursquare button.
- Copy the
foursquare_connect.pngfile from theExamples\OAuthProxyExample\publicfolder and place it in the folder we created for our web page:Examples\FoursquareWDC\public.

If you create a web data connector for a service that uses OAuth or another authorization method, it is best to use the official buttons and logos from the service. Follow whatever guidance the service recommends regarding the use of trademarks and resources, such as buttons and icons. For this tutorial, we downloaded the graphic from the Foursquare resources page: https://foursquare.com/about/logos. Note that the Foursquare UI for downloading assets might change without notice.
Create the HTML markup
- Create a new file named
index.htmlin theExamples\FoursquareWDC\publicfolder. Then copy the following markup into the new file.
<!DOCTYPE html>
<html>
<head>
    <meta charset="utf-8">
    <title>Foursquare Connector</title>
    <meta http-equiv="Cache-Control" content="no-store" />
    <!-- Latest compiled and minified CSS -->
    <link rel="stylesheet" href="https://maxcdn.bootstrapcdn.com/bootstrap/3.3.5/css/bootstrap.min.css">

    <!-- Optional theme -->
    <link rel="stylesheet" href="https://maxcdn.bootstrapcdn.com/bootstrap/3.3.5/css/bootstrap-theme.min.css">
    <!-- Latest compiled and minified JavaScript -->
    <script src="https://ajax.googleapis.com/ajax/libs/jquery/1.11.1/jquery.min.js" type="text/javascript"></script>

    <!-- Latest WDC Library -->
    <script src="https://connectors.tableau.com/libs/tableauwdc-2.2.latest.js" type="text/javascript"></script>

    <!-- Use to access cookie storage to grab access token -->
    <script src="https://cdnjs.cloudflare.com/ajax/libs/js-cookie/2.0.2/js.cookie.min.js" type="text/javascript"></script>

    <!-- This will contain all of your OAuth code -->
    <script src="./foursquareWDC.js" type="text/javascript"></script>
</head>
<body>
  <div style="margin: auto; text-align: center; margin-top: 50px; max-width: 300px">
      <!-- These labels will toggle depending on whether the user is authenticated or not -->
      <p class="signedin">You are signed in!</p>
      <p class="notsignedin">You are not signed in, please click below to sign in to your Foursquare account.</p>

      <!-- The connect to Foursquare button will have a link added to it in the js-->
      <a href="#" id="connectbutton"><img src="./foursquare_connect.png" alt="Login with Foursquare"/></a>
      <br /><br />

      <!-- This button will pull the user's liked venues once the user is authenticated -->
      <p><a href="#" class="btn btn-primary btn-block" id="getvenuesbutton"><span class="glyphicon glyphicon-arrow-down"></span> Get Venues I Like</a></p>
  </div>
</body>
</html>
At the top of the file, there are <script> elements that link to
various libraries: to Twitter Bootstrap, to jQuery, to the Tableau WDC
library, and to the foursquareWDC.js library. The Bootstrap and jQuery
libraries are optional for web data connectors, but we use them in this
tutorial for professional styling (Bootstrap) and to help with some of
the JavaScript coding (jQuery). The WDC library (currently
tableauwdc-2.2.latest.js) is required for all WDCs.
Note: To connect to a web data connector that uses
tableauwdc-2.2.latest.js, you must be using a recent version of Tableau.
For more information, see Web Data Connector Library
Versions.
The foursquareWDC.js file is a separate .js file that you’ll create
shortly. It will contain all the code for making calls to Foursquare.
The page UI consists of a Connect to Foursquare button and a Get Venues I Like button. There is also a single label whose text changes depending on whether the user is authenticated. If you run the page now, both labels are shown.
Add code to manage the UI
The next task is to add JavaScript that controls the UI in the page. The connector should display one label if the user is signed in, and the other label if not.
You also add code that stores the credentials you need later to make calls to Foursquare.
In the Examples\FoursquareWDC\public folder where the foursquareWDC.html file is, create a file named foursquareWDC.js and copy the following code into it. We will wrap the entire contents of the
foursquareWDC.js file in an immediately invoked function expression
(IIFE). This adds a measure of security by preventing other linked scripts from
accessing secure information inside foursquareWDC.js.
  (function() {
  'use strict';

  // This config stores the important strings needed to
  // connect to the foursquare API and OAuth service to
  // gain authorization that we then exchange for an access
  // token.
  //
  // Do not store your client secret here.
  // We are using a server-side OAuth flow, and the client
  // secret is kept on the web server.
  var config = {
      clientId: 'YOUR_CLIENT_ID',
      redirectUri: 'http://localhost:3333/redirect',
      authUrl: 'https://foursquare.com/',
      version: '20190102'
  };

  // more code goes here

})();  // end of anonymous function
Replace YOUR_CLIENT_ID in the code with the client ID that you got
from Foursquare. This is the same client ID that you put in the config.js file when you configured the web server.
Use http://localhost:3333/redirect as the value of redirectUri. This is the URL that Foursquare will call after the user has signed in. You can see that the URL includes the path to redirect, meaning that Foursquare will redirect back to our local web server. The web server will field the response and will extract the access token. Notice also that the server name for the URL is localhost:3333, meaning that the redirect will be made to a server
running on your computer. If the web data connector is hosted on another
server, this URL would have to be changed to reflect that.
The authUrl is the Foursquare address where we send the request for authorization. When the user signs in and grants the web data connector access, Foursquare returns an authorization token.
Important: The values in the foursquareWDC.js file, including your
client ID, could be visible to anyone who can access your web data connector.
Don’t put your client secret here. In this tutorial, we are using the authorization code grant type and server-side flow, so the client secret is not
embedded in this .js file. The client secret is in the configuration file for the web server that communicates with the OAuth provider. Users of the web data connector never have access to the client secret.
Finally, note that the config object contains a version value, which
is a date. You must include a version value each time you make a call to
Foursquare. For more information about this value, see Versioning
& Internationalization
on the Foursquare website.
Now add the code for managing the UI in the page. Copy the following
code and add it to the foursquareWDC.js file below the config object
definition.
  // This function parses the access token in the URI if available
  // It also adds a link to the foursquare connect button
  $(document).ready(function() {
      var accessToken = Cookies.get("accessToken");
      var hasAuth = accessToken && accessToken.length > 0;
      updateUIWithAuthState(hasAuth);

      $("#connectbutton").click(function() {
          doAuthRedirect();
      });

      $("#getvenuesbutton").click(function() {
          tableau.connectionName = "Foursquare Venues Data";
          tableau.submit();
      });
  });
The document.ready function is jQuery code that runs whenever the page
is loaded. The first few lines check to see if the user has already logged in and is already authenticated with the OAuth provider. Because we are handling OAuth using the server-side flow, the server keeps the client secret and handles the required authorization to obtain the access token from Foursquare. The web server can safely pass the access token to our web data connector using browser cookies. The client secret remains secret and unknown to the web data connector. After the authorization state has been checked, the code calls the
updateUIWithAuthState function, a function that we will add later, which toggles the visibility of text
in the page by setting CSS style attributes for different <p> elements
in the page.
The next section in our document.ready function links the buttons on the web page to the functions we will add to login to Foursquare (doAuthRedirect()) and create the web data connector (getvenuesbutton()).
Step 5 Add Code for OAuth Sign-in
In this part of the tutorial, you add JavaScript code that manages the OAuth sign-in process to get authorization. When a user clicks the Connect to Foursquare button, your code redirects the user to Foursquare, where the user can sign in. After the user signs in, Foursquare redirects the user back to the local web server with an authorization code. The web server takes the authorization code and adds the client secret in a request back to Foursquare to get the access token that will be used for making requests for data. Foursquare sends the access token back to the web server. The web server saves the access token in the browser cookie, so that the client code (your web data connector) can retrieve it. You’ll add code to retrieve the OAuth access token from the browser cookie.
Add code for initial sign-in
First we’ll add the code to enable the user to log in to Foursquare. Add this to your foursquareWDC.js file right after the $(document).ready method and within the anonymous function.
  // An on-click function for the connect to foursquare button,
  // This will redirect the user to a foursquare login
  function doAuthRedirect() {
      var appId = config.clientId;
      if (tableau.authPurpose === tableau.authPurposeEnum.ephemerel) {
        appId = config.clientId;  // This should be Desktop
      } else if (tableau.authPurpose === tableau.authPurposeEnum.enduring) {
        appId = config.clientId; // This should be the Tableau Server appID
      }

      var url = config.authUrl + 'oauth2/authenticate?response_type=code&client_id=' + appId +
              '&redirect_uri=' + config.redirectUri;
      window.location.href = url;
  }
You will notice that the first part of the code for the doAuthRedirect() method checks the tableau.authPurpose enum before selecting the client ID to use. The conditional check is because you might have two different client IDs for the web data connector: one for Tableau Desktop and one for Tableau Server. The reason for multiple client IDs is that some OAuth services limit the number of access tokens that can be granted at a time. This is to avoid situations where a Tableau Desktop user who wants to add a web data connector ends up taking an access token away from a web data connector that is used in a workbook on Tableau Server. For more information, see Authentication.
The second part of the doAuthRedirect() method builds the URL to send to Foursquare to obtain the authorization code. This request includes the client ID and the redirect URI that are declared in the configuration section of this file. The redirect URI is our local web server http://localhost:3333/redirect. Notice also that the request includes response_type=code. This indicates that the request is for an authorization code. The web server has the client secret and will use the client secret and the authorization code to acquire the access token.
Add code to help with the OAuth requests
Next, we need to add the code to make the request to Foursquare for the venue data when the user clicks the getvenuesbutton. And we also need to add the code to control which buttons are visible in the UI, depending upon the whether the user is signed in or not.
Add the following code after the doAuthRedirect() method.
  //------------- OAuth Helpers -------------//
  // This helper function returns the URI for the venueLikes endpoint
  // It appends the passed in accessToken to the call to personalize the call for the user
  function getVenueLikesURI(accessToken) {
      return "https://api.foursquare.com/v2/users/self/venuelikes?oauth_token=" +
              accessToken + "&v=" + config.version;
  }

  // This function toggles the label shown depending
  // on whether or not the user has been authenticated
  function updateUIWithAuthState(hasAuth) {
      if (hasAuth) {
          $(".notsignedin").css('display', 'none');
          $(".signedin").css('display', 'block');
      } else {
          $(".notsignedin").css('display', 'block');
          $(".signedin").css('display', 'none');
      }
  }
The getVenueLikesURI() method creates the request to Foursquare using the access token that was sent to our local web server as part of the authorization flow. The web server saved the access token in a browser cookie and then redirected the browser back to our web data connector.
The presence of the access token is the first thing the web data connector does on page load in the $(document).ready() function.
The code that we added also includes the updateUIWithAuthState method that handles the UI state and displays the buttons appropriately depending upon whether the user is signed in to Foursquare or not.
The page so far
At this point, the foursquareWDC.js file has the following content.
(Remember that you must substitute your own client ID in the config
object.)
 (function() {
  'use strict';

  // This config stores the important strings needed to
  // connect to the foursquare API and OAuth service to
  // gain authorization that we then exchange for an access
  // token.
  //
  // Do not store your client secret here.
  // We are using a server-side OAuth flow, and the client
  // secret is kept on the web server.
  var config = {
      clientId: 'YOUR_CLIENT_ID',
      redirectUri: 'http://localhost:3333/redirect',
      authUrl: 'https://foursquare.com/',
      version: '20190102'
  };
  // This function parses the access token in the URI if available
  // It also adds a link to the foursquare connect button
  $(document).ready(function() {
      var accessToken = Cookies.get("accessToken");
      var hasAuth = accessToken && accessToken.length > 0;
      updateUIWithAuthState(hasAuth);

      $("#connectbutton").click(function() {
          doAuthRedirect();
      });

      $("#getvenuesbutton").click(function() {
          tableau.connectionName = "Foursquare Venues Data";
          tableau.submit();
      });
  });

  // An on-click function for the connect to foursquare button,
  // This will redirect the user to a foursquare login
  function doAuthRedirect() {
      var appId = config.clientId;
      if (tableau.authPurpose === tableau.authPurposeEnum.ephemerel) {
        appId = config.clientId;  // This should be Desktop
      } else if (tableau.authPurpose === tableau.authPurposeEnum.enduring) {
        appId = config.clientId; // This should be the Tableau Server appID
      }

      var url = config.authUrl + 'oauth2/authenticate?response_type=code&client_id=' + appId +
              '&redirect_uri=' + config.redirectUri;
      window.location.href = url;
  }

  //------------- OAuth Helpers -------------//
  // This helper function returns the URI for the venueLikes endpoint
  // It appends the passed in accessToken to the call to personalize the call for the user
  function getVenueLikesURI(accessToken) {
      return "https://api.foursquare.com/v2/users/self/venuelikes?oauth_token=" +
              accessToken + "&v=" + config.version;
  }

  // This function toggles the label shown depending
  // on whether or not the user has been authenticated
  function updateUIWithAuthState(hasAuth) {
      if (hasAuth) {
          $(".notsignedin").css('display', 'none');
          $(".signedin").css('display', 'block');
      } else {
          $(".notsignedin").css('display', 'block');
          $(".signedin").css('display', 'none');
      }
  }


})();  // end of anonymous function
Next
In the next part of the tutorial, you’ll test the Foursquare sign-in process.
Step 6 Test OAuth Sign-in
You can now test OAuth sign-in by starting the local web server. The web server uses Node.js and the Express framework. You can do this test in the browser without using the simulator that is part of the Web Data Connector SDK.
-
Open a Command Prompt or shell window and go to the folder you created for this tutorial (
Examples\foursquareWDC). -
Run command: npm start
Note: We’re assuming throughout this tutorial that the web server is listening on port 3333 and that the
index.htmlpage is in theExamples\foursquareWDC\publicfolder of the WDC SDK installation. -
Open a browser window and enter the following URL:
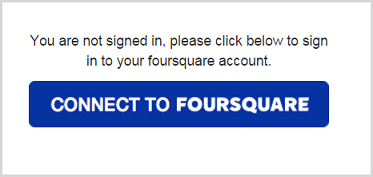
http://localhost:3333You see the following in your browser:
-
Click Connect to Foursquare.
You see the Foursquare page that prompts you to sign in.
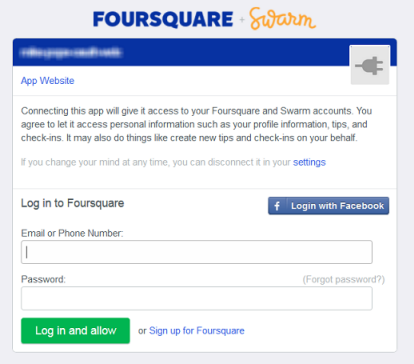
-
Sign in and click Log in and allow. Foursquare redirects you back to the web data connector page in the browser.
Note: If you see the message that you are already signed in, you might need to delete cookies from your browsing history. For example, in Chrome, go to Settings, click Advanced, and choose Clear Browsing Data.
After you have successfully logged in, if you look in the Command Prompt or shell window where you started the server, you should see something similar to the following.
NNNNNNNNNNNNNNNNNNNNNNNNNNNNNNNNNNNNNNNNNNNNNNNN
XXXXXXXXXXXXXXXXXXXXXXXXXXXXXXXXXXXXXXXXXXXXXXXX
Express server listening on port 3333
Auth Code is: AAAAAAAAAAAAAAAAAAAAAAAAAAAAAAAAAAAAAAAAAAAAAAAA
accessToken: BBBBBBBBBBBBBBBBBBBBBBBBBBBBBBBBBBBBBBBBBBBBBBBB
When the Express web server starts up, it prints the client ID and the client secret to the console and then listens on port 3333. When the user signs in to Foursquare and grants permission to share data with the web data connector, Foursquare redirects the browser back to the web server with the authorization code. The web server prints out the authorization code and the access token when the authorization process is successful. The connector is now authorized to read your Foursquare info.
Next
In the next Step of the tutorial, you’ll add the code that runs during the data-gathering phase of the web data connector to get the schema and the data.
Step 7 Get Columns and Data
So far, all the code you’ve added was for getting the OAuth authorization code and the access token. In this part of the tutorial you’ll add the JavaScript code that all web data connectors have—code to get the schema (field names and types) for the data, and to get the data itself. This code is similar to the equivalent code in the basic tutorial.
Add code to get columns and data
Copy the following code into the bottom of the foursquareWDC.js file.
  //------------- Tableau WDC code -------------//
  // Create tableau connector, should be called first
  var myConnector = tableau.makeConnector();


  // Declare the data to Tableau that we are returning from Foursquare
  myConnector.getSchema = function(schemaCallback) {
      var schema = [];

      var col1 = { id: "Name", dataType: "string"};
      var col2 = { id: "Latitude", dataType: "float"};
      var col3 = { id: "Longitude", dataType: "float"};
      var col4 = { id: "Address", dataType: "string"};
      var cols = [col1, col2, col3, col4];

      var tableInfo = {
        id: "FoursquareTable",
        columns: cols
      }

      schema.push(tableInfo);

      schemaCallback(schema);
  };

  // This function actually make the foursquare API call and
  // parses the results and passes them back to Tableau
  myConnector.getData = function(table, doneCallback) {
      var dataToReturn = [];
      var hasMoreData = false;

      var accessToken = tableau.password;
      var connectionUri = getVenueLikesURI(accessToken);

      var xhr = $.ajax({
          url: connectionUri,
          dataType: 'json',
          success: function (data) {
              if (data.response) {
                  var venues = data.response.venues.items;

                  var ii;
                  for (ii = 0; ii < venues.length; ++ii) {
                      var venue = {'Name': venues[ii].name,
                                   'Latitude': venues[ii].location.lat,
                                   'Longitude': venues[ii].location.lng,
                                   'Address' : venues[ii].location.address};
                      dataToReturn.push(venue);
                  }

                  table.appendRows(dataToReturn);
                  doneCallback();
              }
              else {
                  tableau.abortWithError("No results found");
              }
          },
          error: function (xhr, ajaxOptions, thrownError) {
              // WDC should do more granular error checking here
              // or on the server side.  This is just a sample of new API.
              tableau.abortForAuth("Invalid Access Token");
          }
      });
  };

  // Register the tableau connector, call this last
  tableau.registerConnector(myConnector);
The code you copied and added to the file follows the same outline as other web data connectors. The code
starts by calling tableau.makeConnector to create an instance of the
connector. It then adds code to define the data schema
(getSchema) and to actually fetch the data (getData).
When the connector is completely configured, the code calls
tableau.registerConnector.
In this tutorial, the getSchema function defines four fields
and corresponding data types. The getData function is similar to the one from the basic tutorial. The code calls the helper
function we added earlier (getVenueLikesURI) to create the request URI, and then uses jQuery to make an AJAX
call to the data source. When the data is returned, a function in the
success parameter parses the data, creates JavaScript objects out of
each returned value, and then calls the doneCallback function
to send the data to Tableau.
One difference from the other two WDC tutorials is that this time the getData function contains these lines:
    var accessToken = tableau.password;
    var connectionUri = getVenueLikesURI(accessToken);
When the getData function sends a request to Foursquare, the URL
of the request has to include the access token. You might remember from
the Multiple Tables Tutorial that you can use the tableau.connectionData
property to pass values from the interactive (UI) phase of the connector
to the data-gathering phase. (Because the phases run in separate browser
sessions, you can’t use other mechanisms to share values between the
phases.) In the Multiple Tables tutorial, you use tableau.connectionData to
pass the date object that contains the start and end dates between phases.
When you’re using OAuth, you have the same issue with the access token—you gather it from the user authorization flow in the interactive phase, but you need to use it in the data-gathering phase.
You can use the tableau.password property for this purpose. It’s designed specifically for sensitive
information like passwords or access tokens. The tableau.password property, like tableau.connectionData, allows you to pass values between phases of the connector. However, you should never use tableau.connectionData for sensitive information like passwords or access tokens.
Although the code includes a function to extract the access token, you
haven’t set the value of the tableau.password yet. You’ll do that
shortly.
Step 8 Manage Credentials
In this part of the tutorial, you add code to make sure that the connector has an OAuth access token before it makes requests to Foursquare. If the access token is not available, you display UI in the connector to let the user sign in again. You’ll learn about the following:
-
Persisting credentials in the
tableau.usernameproperty. -
The authorization and authentication (auth) phase of the connector, which occurs if Tableau needs credentials in order to refresh an extract.
Sidebar: Credentials in web data connectors
Before you start this part of the tutorial, it’s helpful to review how
Tableau manages credentials when a user works with a web data connector
in Tableau. If a connector requires basic authentication, you add markup and
code to get credentials from the user. When the user loads the web data
connector into Tableau, the connector goes through its interactive phase
(UI phase) and uses your UI to gather information and credentials from
the user. When you store parameter information in the
tableau.connectionData property, you store any user credentials in the
tableau.username and tableau.password properties. For OAuth
authentication, the process is slightly different, depending upon whether you are using server-side or client-side flow and are using an authorization token and client secret to acquire the access token. In either case, the goal is to end up with an access token you can use to make requests on behalf of the user. For OAuth, you store the access token in the tableau.password
property.
When the user finishes entering information and credentials, in basic authentication, or finishes the authentication phase with the OAuth provider, Tableau
loads the connector again and the connector goes through its
data-gathering phase. In that phase, Tableau calls the connector’s
getSchema and getData functions. When these functions
make calls to the data source, they can get the OAuth access token from
the tableau.password property and use it when constructing requests to
fetch data.
While the user is working in Tableau, the value in the
tableau.password property is not persisted between sessions.
Therefore, if the user closes Tableau, re-opens it, and re-loads a
workbook that uses the web data connector, Tableau doesn’t have the
access token. Specifically, there’s no value in the tableau.password
property.
In that case, Tableau calls the connector just to get the credentials again. This is referred to as the authentication phase or auth phase. For connectors that simply get the username and password (such as a connector that accesses a data source like SQL Server), Tableau can display a standard sign-in UI. However, Tableau has no built-in UI for OAuth. Therefore, Tableau has to tell your connector to display the UI that you’ve created to redirect the user sign in to the OAuth provider.
In the auth phase, the connector should display only the UI that’s
required in order to get the user’s credentials. In this phase, the
connector doesn’t need to ask the user for any other information, such
as query parameter values. (In fact, in the auth phase, Tableau ignores any changes that
you make except those to the tableau.username and tableau.password
properties.) To determine whether your connector is being loaded in auth
phase, you can test the tableau.phase property. The following example
shows how you can determine what phase the connector is in.
if (tableau.phase == tableau.phaseEnum.authPhase) {
    // Display OAuth authentication UI
}
Manage credentials during the data-gathering phase
Because you’re using OAuth, you have to include custom initialization
logic—that is, you have to include a tableau.init function in your web
data connector code. (For web data connectors that don’t use OAuth, the
Web Data Connector .js library provides a default init function, so
you only need to create an init function if you need to add custom
initialization code.)
After the call to tableau.makeConnector and before myConnector.getSchema, add the following code:
   // add this after tableau.makeConnector() function.

  // Init function for connector, called during every phase but
  // only called when running inside the simulator or tableau
  myConnector.init = function(initCallback) {
      tableau.authType = tableau.authTypeEnum.custom;

      // If we are in the auth phase we only want to show the UI needed for auth
      if (tableau.phase == tableau.phaseEnum.authPhase) {
        $("#getvenuesbutton").css('display', 'none');
      }

      if (tableau.phase == tableau.phaseEnum.gatherDataPhase) {
        // If the API that WDC is using has an endpoint that checks
        // the validity of an access token, that could be used here.
        // Then the WDC can call tableau.abortForAuth if that access token
        // is invalid.
      }

      var accessToken = Cookies.get("accessToken");
      console.log("Access token is '" + accessToken + "'");
      var hasAuth = (accessToken && accessToken.length > 0) || tableau.password.length > 0;
      updateUIWithAuthState(hasAuth);

      initCallback();

      // If we are not in the data gathering phase, we want to store the token
      // This allows us to access the token in the data gathering phase
      if (tableau.phase == tableau.phaseEnum.interactivePhase || tableau.phase == tableau.phaseEnum.authPhase) {
          if (hasAuth) {
              tableau.password = accessToken;

              if (tableau.phase == tableau.phaseEnum.authPhase) {
                // Auto-submit here if we are in the auth phase
                tableau.submit()
              }

              return;
          }
      }
  };

    // The myConnector.getSchema() goes here
Code explanation
The connector’s init function is called each time that the connector
is loaded. This gives the connector an opportunity to perform any
initialization that the connector requires in each phase. In the init function, we set the tableau.authType to custom, so that we can setup the OAuth flow in the WDC auth phase. The auth phase is similar to the interactive phase. You can determine what phase is active by testing the
tableau.phase property.
In this connector, one task for the init function is to get the
access token from the page cookies. As you’ve already seen, during the
interactive phase, the connector redirects to Foursquare, and Foursquare
redirects back to the proxy web server using a URL that includes the authorization token. The proxy web server the sends the authorization token along with the client secret to Foursquare. Foursquare responds by returning the access token in the response. Our Node.js Express web server sets the access token in a client cookie. When the connector is loaded again for the
data-gathering phase, the page checks the validity of the access token before proceeding. If the access token is valid and the connector has authorization (hasAuth), the connector saves the access token in tableau.password property. This makes the access token available to the getData function for the data-gathering phase.
Another task for the init code is to display the appropriate UI for
the phase that the connector is in, or to test the validity of the access token. These are the conditions:
-
If the user is not signed in to Foursquare, the text “You are not signed in” should be displayed. This is handled with a call to the
updateUIWithAuthStatehelper function that we added to the file earlier. -
Optionally, call the
tableau.abortForAuthmethod. This method is provided for cases where the access token has expired or has been revoked. Thetableau.abortForAuthmethod must be called from the init method during the gather data phase. Some APIs provide an endpoint for testing the validity of the access token. In that scenario, before fetching data, the WDC would want to call this method in order to re-authenticate the user. See Authentication. -
If the connector is in its interactive phase and if the user is not yet signed in, the Get Venues I Like button should be hidden—this button is useful only after the user is signed in.
-
Similarly, if the connector is in its auth phase, the only UI that the page should display is the button that lets the user sign in. In this tutorial, this also consists of hiding the Get Venues I Like button.
You might recognize some of this logic from the document.ready
function that you added earlier in the tutorial, where we also call the updateUIWithAuthState helper function. This allows you to work
with the connector in a browser, which is useful for testing in the
simulator, as we’ll explain in the next part of the tutorial.
As in any web data connector, when the user has finished interacting
with the page, your code sets tableau object properties like
connectionName and connectionData (if required), and calls
tableau.submit to tell Tableau that the interactive phase is done.
One difference in this init function, is that when the user has been authenticated, we store the access token in tableau.password.
line:
tableau.password = accessToken;
Step 9 Test the Connector in the Simulator
In this part of the tutorial, you’ll test the finished connector in the simulator that’s part of the Web Data Connector SDK.
Test the finished connector in the simulator
You can now test the web data connector in the simulator. If you haven’t done so already, you need to follow the steps in Getting Started to install the components needed to run the simulator.
-
Open a Command Prompt or shell window and navigate to the
webdataconnectorfolder. This is the top-level folder if you downloaded or cloned the WDC repository. If you haven’t done so already, start the web server that runs the simulator.npm start -
Start the simulator by entering the following in your browser:
localhost:8888/simulator/(As before, we’re assuming that the server is listening on port 8888.)
-
In the WDC URL box at the top of the simulator, enter the path to the foursquare connector:
../Examples/foursquareWDC/public -
Click the Start Interactive Phase button.
The simulator opens a window and displays the UI for the Foursquare web data connector.
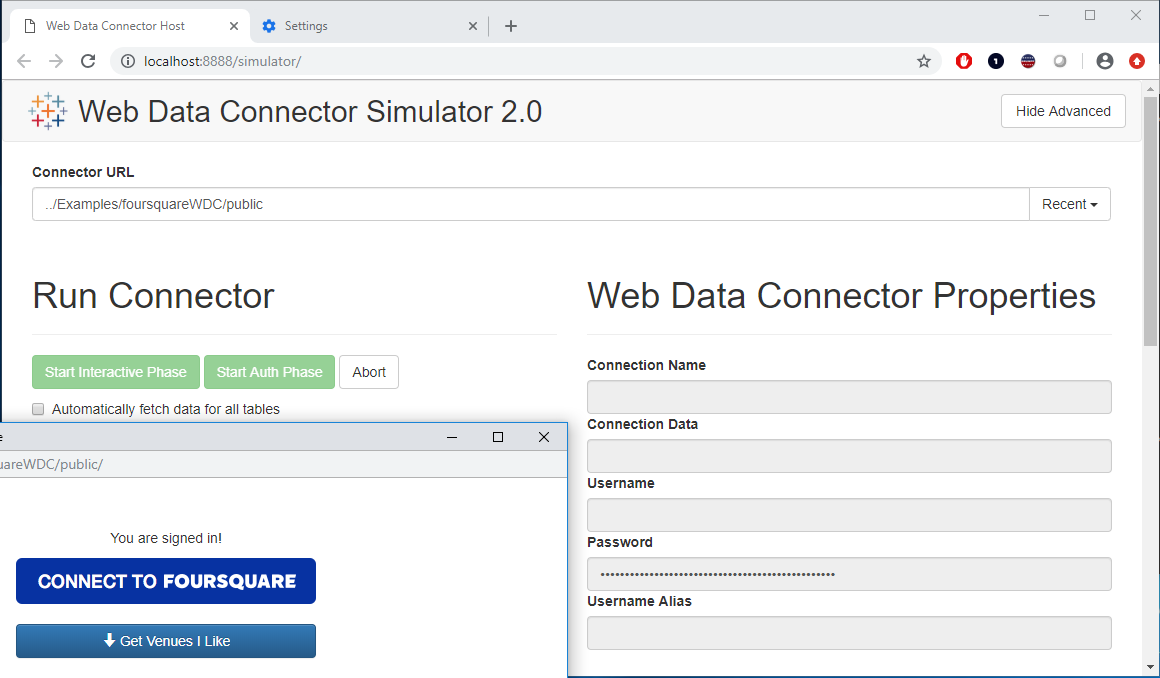
-
If the page indicates that you’re not logged in to Foursquare, click the Connect to Foursquare button and log in.
-
After you have logged in, click the Get Venues I Like button.
The simulator closes the window that displayed the UI phase of the connector and returns to the main simulator window. At the bottom of the main simulator window, the simulator displays the column names and the types for the table schema you defined.
-
Click Fetch Table Data to display the values for any venues that you’ve “Liked” on Foursquare.
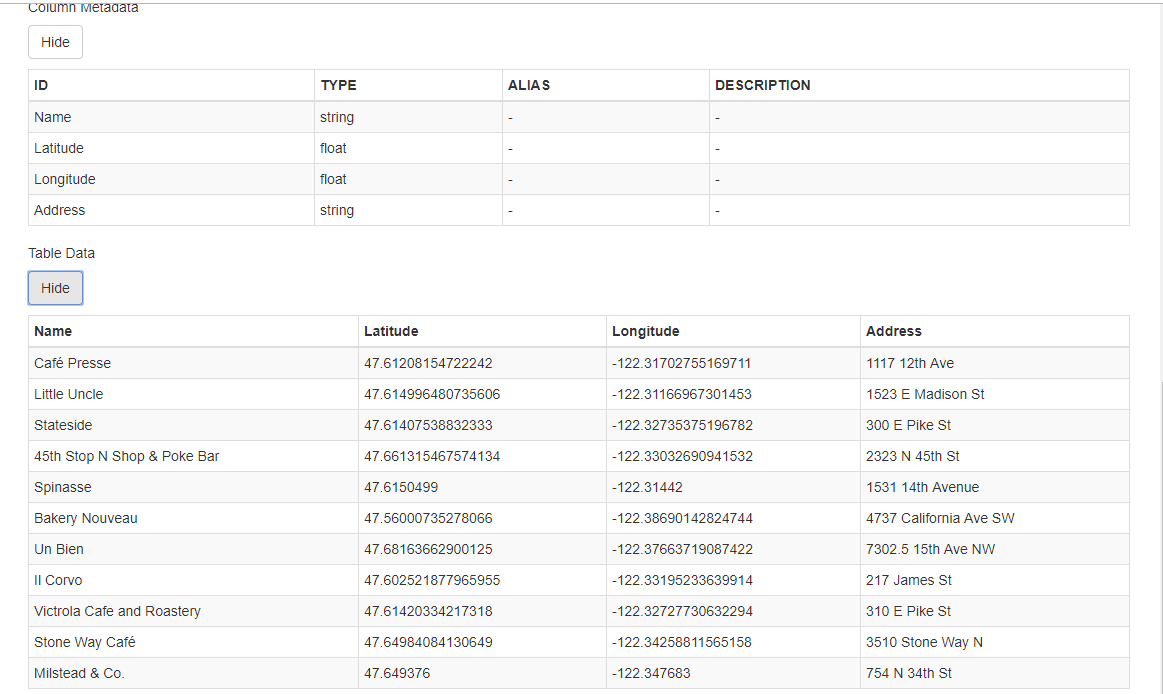
Notice also that the simulator has filled the Password box with the authentication token. Remember that in your code, when you got the authentication token back from Foursquare, you set the
tableau.passwordproperty to the token value. When you run the simulator, after the UI phase is done, the simulator displays the values oftableauobject properties.Note: If you see the message that you are already signed in, and you want to test the sign in process, you might need to delete cookies from your browsing history. For example, in Chrome, go to Settings, click Advanced, and choose Clear Browsing Data.
Step 10 Test the Connector in Tableau
In this final part of the tutorial, you’ll use your connector in Tableau to display a map that includes locations that you’ve “Liked” in Foursquare.
Test in Tableau
The OAuth Foursquare web data connector is complete! You can now test it in Tableau.
-
Make sure you have “Liked” at least a few venues on Foursquare, or you won’t have any data to view in Tableau.
-
Open Tableau.
-
In the Connect pane, under To a Server, choose Web Data Connector. You might need to choose More… to find it.
-
Enter the URL of your connector (
http://localhost:3333). -
Click the Connect to Foursquare button and sign in.
-
In the connector, click Get Venues I Like.
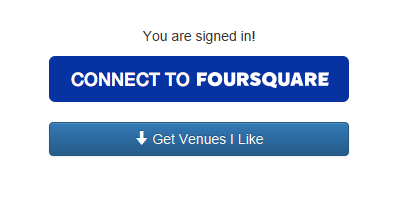
-
The connector creates an extract that contains information about the venues you have liked on Foursquare, and Tableau opens a workbook that uses the extract.
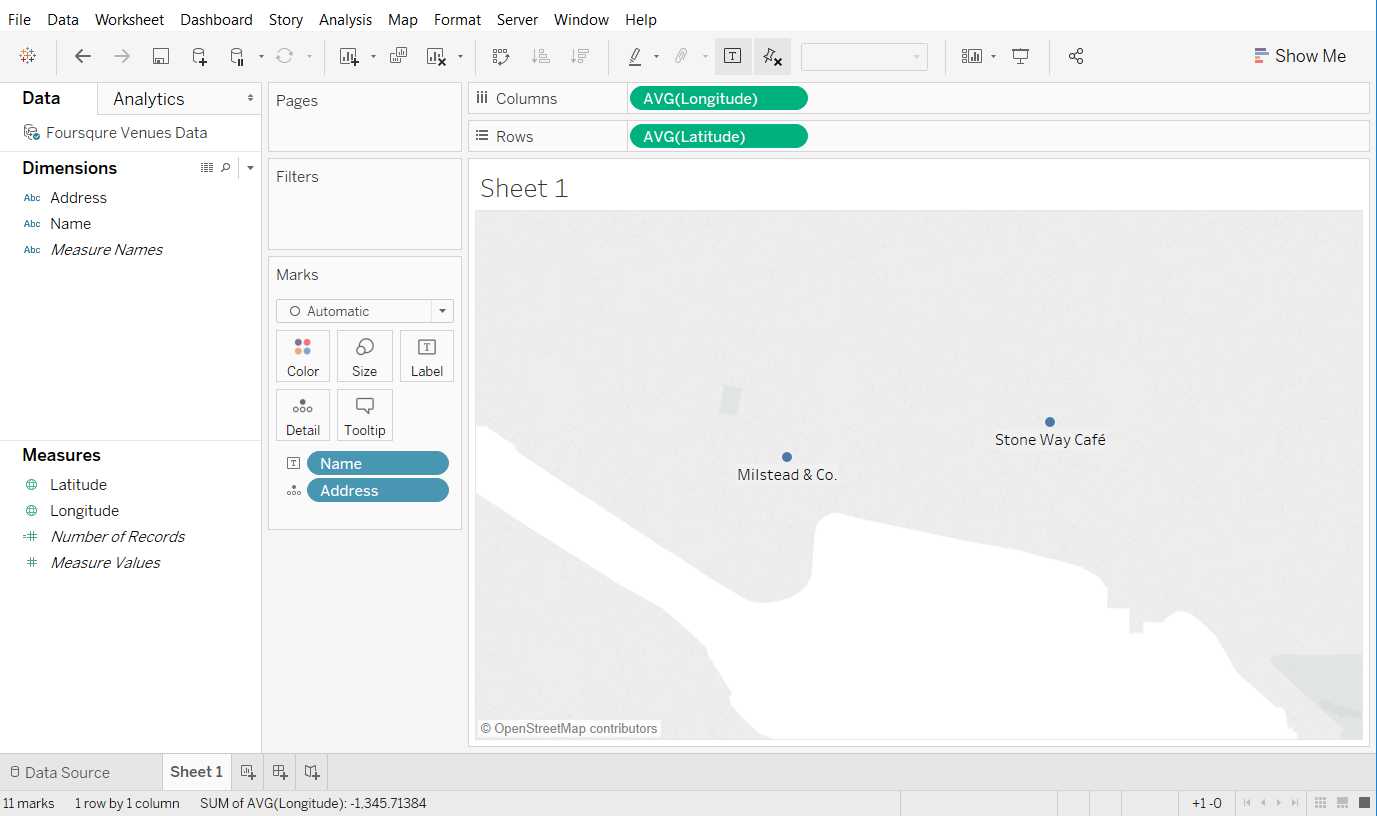
To see what the data looks like in Tableau, do this:
-
Drag Longitude to the Columns shelf.
-
Drag Latitude to the Rows shelf.
-
Drag Name to Label in the Marks card.
-
Drag Address to Details in the Marks card.
The viz displays a map that shows places you’ve “Liked.”
Complete Code Listing
This page provides complete code listings (foursquareWDC.html and foursquareWDC.js) for the web data connector Node Proxy OAuth client tutorial (app.js and config.js).
FoursquareWDC.html page
Note: This listing includes a reference to the tableauwdc-2.2.latest.js
To connect to a web data connector that uses that version of the WDC
library, you must be using a recent version of Tableau. For more
information, see Web Data Connector Library
Versions.
<!DOCTYPE html>
<html>
<head>
    <meta charset="utf-8">
    <title>Foursquare Connector</title>
    <meta http-equiv="Cache-Control" content="no-store" />
    <!-- Latest compiled and minified CSS -->
    <link rel="stylesheet" href="https://maxcdn.bootstrapcdn.com/bootstrap/3.3.5/css/bootstrap.min.css">

    <!-- Optional theme -->
    <link rel="stylesheet" href="https://maxcdn.bootstrapcdn.com/bootstrap/3.3.5/css/bootstrap-theme.min.css">
    <!-- Latest compiled and minified JavaScript -->
    <script src="https://ajax.googleapis.com/ajax/libs/jquery/1.11.1/jquery.min.js" type="text/javascript"></script>

    <!-- Latest WDC Library -->
    <script src="https://connectors.tableau.com/libs/tableauwdc-2.2.latest.js" type="text/javascript"></script>

    <!-- Use to access cookie storage to grab access token -->
    <script src="https://cdnjs.cloudflare.com/ajax/libs/js-cookie/2.0.2/js.cookie.min.js" type="text/javascript"></script>

    <!-- This will contain all of your OAuth code -->
    <script src="./foursquareWDC.js" type="text/javascript"></script>
</head>
<body>
  <div style="margin: auto; text-align: center; margin-top: 50px; max-width: 300px">
      <!-- These labels will toggle depending on whether the user is authenticated or not -->
      <p class="signedin">You are signed in!</p>
      <p class="notsignedin">You are not signed in, please click below to sign in to your Foursquare account.</p>

      <!-- The connect to Foursquare button will have a link added to it in the js-->
      <a href="#" id="connectbutton"><img src="./foursquare_connect.png" alt="Login with Foursquare"/></a>
      <br /><br />

      <!-- This button will pull the user's liked venues once the user is authenticated -->
      <p><a href="#" class="btn btn-primary btn-block" id="getvenuesbutton"><span class="glyphicon glyphicon-arrow-down"></span> Get Venues I Like</a></p>
  </div>
</body>
</html>
FoursquareWDC.js
 (function() {
  'use strict';

  // This config stores the important strings needed to
  // connect to the foursquare API and OAuth service to
  // gain authorization that we then exchange for an access
  // token.
  //
  // Do not store your client secret here.
  // We are using a server-side OAuth flow, and the client
  // secret is kept on the web server.
  var config = {
      clientId: 'YOUR_CLIENT_ID',
      redirectUri: 'http://localhost:3333/redirect',
      authUrl: 'https://foursquare.com/',
      version: '20190102'
  };
   //  more code goes here

  // This function parses the access token in the URI if available
  // It also adds a link to the foursquare connect button
  $(document).ready(function() {
      var accessToken = Cookies.get("accessToken");
      var hasAuth = accessToken && accessToken.length > 0;
      updateUIWithAuthState(hasAuth);

      $("#connectbutton").click(function() {
          doAuthRedirect();
      });

      $("#getvenuesbutton").click(function() {
          tableau.connectionName = "Foursquare Venues Data";
          tableau.submit();
      });
  });

  // An on-click function for the connect to foursquare button,
  // This will redirect the user to a foursquare login
  function doAuthRedirect() {
      var appId = config.clientId;
      if (tableau.authPurpose === tableau.authPurposeEnum.ephemerel) {
        appId = config.clientId;  // This should be Desktop
      } else if (tableau.authPurpose === tableau.authPurposeEnum.enduring) {
        appId = config.clientId; // This should be the Tableau Server appID
      }

      var url = config.authUrl + 'oauth2/authenticate?response_type=code&client_id=' + appId +
              '&redirect_uri=' + config.redirectUri;
      window.location.href = url;
  }

  //------------- OAuth Helpers -------------//
  // This helper function returns the URI for the venueLikes endpoint
  // It appends the passed in accessToken to the call to personalize the call for the user
  function getVenueLikesURI(accessToken) {
      return "https://api.foursquare.com/v2/users/self/venuelikes?oauth_token=" +
              accessToken + "&v=" + config.version;
  }

  // This function toggles the label shown depending
  // on whether or not the user has been authenticated
  function updateUIWithAuthState(hasAuth) {
      if (hasAuth) {
          $(".notsignedin").css('display', 'none');
          $(".signedin").css('display', 'block');
      } else {
          $(".notsignedin").css('display', 'block');
          $(".signedin").css('display', 'none');
      }
  }

  //------------- Tableau WDC code -------------//
  // Create tableau connector, should be called first
  var myConnector = tableau.makeConnector();

  // Init function for connector, called during every phase but
  // only called when running inside the simulator or tableau
  myConnector.init = function(initCallback) {
      tableau.authType = tableau.authTypeEnum.custom;

      // If we are in the auth phase we only want to show the UI needed for auth
      if (tableau.phase == tableau.phaseEnum.authPhase) {
        $("#getvenuesbutton").css('display', 'none');
      }

      if (tableau.phase == tableau.phaseEnum.gatherDataPhase) {
        // If API that WDC is using has an endpoint that checks
        // the validity of an access token, that could be used here.
        // Then the WDC can call tableau.abortForAuth if that access token
        // is invalid.
      }

      var accessToken = Cookies.get("accessToken");
      console.log("Access token is '" + accessToken + "'");
      var hasAuth = (accessToken && accessToken.length > 0) || tableau.password.length > 0;
      updateUIWithAuthState(hasAuth);

      initCallback();

      // If we are not in the data gathering phase, we want to store the token
      // This allows us to access the token in the data gathering phase
      if (tableau.phase == tableau.phaseEnum.interactivePhase || tableau.phase == tableau.phaseEnum.authPhase) {
          if (hasAuth) {
              tableau.password = accessToken;

              if (tableau.phase == tableau.phaseEnum.authPhase) {
                // Auto-submit here if we are in the auth phase
                tableau.submit()
              }

              return;
          }
      }
  };

  // Declare the data to Tableau that we are returning from Foursquare
  myConnector.getSchema = function(schemaCallback) {
      var schema = [];

      var col1 = { id: "Name", dataType: "string"};
      var col2 = { id: "Latitude", dataType: "float"};
      var col3 = { id: "Longitude", dataType: "float"};
      var col4 = { id: "Address", dataType: "string"};
      var cols = [col1, col2, col3, col4];

      var tableInfo = {
        id: "FoursquareTable",
        columns: cols
      }

      schema.push(tableInfo);

      schemaCallback(schema);
  };

  // This function actually make the foursquare API call and
  // parses the results and passes them back to Tableau
  myConnector.getData = function(table, doneCallback) {
      var dataToReturn = [];
      var hasMoreData = false;

      var accessToken = tableau.password;
      var connectionUri = getVenueLikesURI(accessToken);

      var xhr = $.ajax({
          url: connectionUri,
          dataType: 'json',
          success: function (data) {
              if (data.response) {
                  var venues = data.response.venues.items;

                  var ii;
                  for (ii = 0; ii < venues.length; ++ii) {
                      var venue = {'Name': venues[ii].name,
                                   'Latitude': venues[ii].location.lat,
                                   'Longitude': venues[ii].location.lng,
                                   'Address' : venues[ii].location.address};
                      dataToReturn.push(venue);
                  }

                  table.appendRows(dataToReturn);
                  doneCallback();
              }
              else {
                  tableau.abortWithError("No results found");
              }
          },
          error: function (xhr, ajaxOptions, thrownError) {
              // WDC should do more granular error checking here
              // or on the server side.  This is just a sample of new API.
              tableau.abortForAuth("Invalid Access Token");
          }
      });
  };

  // Register the tableau connector, call this last
  tableau.registerConnector(myConnector);


})();  // end of anonymous function
Config.js
Configuration file for Node.js Express web server.
// The necessary configuration for your server
// Contains credentials for your Foursquare application
// And the new redirect path for the OAuth flow
module.exports = {
 'HOSTPATH': 'http://localhost',
 'PORT': 3333,
 'CLIENT_ID': 'YOUR_CLIENT_ID',
 'CLIENT_SECRET': 'YOUR_CLIENT_SECRET',
 'REDIRECT_PATH': '/redirect'
};
app.js
Express web server, using Node.js.
// -------------------------------------------------- //
// Module Dependencies
// -------------------------------------------------- //
var express = require('express');
var cookieParser = require('cookie-parser');
var querystring = require('querystring');
var http = require('http');
var request = require('request');
var path = require('path');
var config = require('./config.js');              // Get our config info (app id and app secret)
var sys = require('util');

var app = express();

// -------------------------------------------------- //
// Express set-up and middleware
// -------------------------------------------------- //
app.set('port', (process.env.PORT || config.PORT));
app.use(cookieParser());                                    // cookieParser middleware to work with cookies
app.use(express.static(__dirname + '/public'));

// -------------------------------------------------- //
// Variables
// -------------------------------------------------- //
var clientID = process.env.FOURSQUARE_CLIENT_ID || config.CLIENT_ID;
var clientSecret = process.env.FOURSQUARE_CLIENT_SECRET || config.CLIENT_SECRET;
console.log(clientID);
console.log(clientSecret);
var redirectURI = config.HOSTPATH + ":" + config.PORT + config.REDIRECT_PATH

// -------------------------------------------------- //
// Routes
// -------------------------------------------------- //

app.get('/', function(req, res) {
  console.log("got here");
  res.redirect('/index.html');
});

// This route is hit once Foursquare redirects to our
// server after performing authentication
app.get('/redirect', function(req, res) {
  // get our authorization code
  authCode = req.query.code;
  console.log("Auth Code is: " + authCode);

  // Set up a request for an long-lived Access Token now that we have a code
  var requestObject = {
      'client_id': clientID,
      'redirect_uri': redirectURI,
      'client_secret': clientSecret,
      'code': authCode,
      'grant_type': 'authorization_code'
  };

  var token_request_header = {
      'Content-Type': 'application/x-www-form-urlencoded'
  };

  // Build the post request for the OAuth endpoint
  var options = {
      method: 'POST',
      url: 'https://foursquare.com/oauth2/access_token',
      form: requestObject,
      headers: token_request_header
  };

  // Make the request
  request(options, function (error, response, body) {
    if (!error) {
      // We should receive  { access_token: ACCESS_TOKEN }
      // if everything went smoothly, so parse the token from the response
      body = JSON.parse(body);
      var accessToken = body.access_token;
      console.log('accessToken: ' + accessToken);

      // Set the token in cookies so the client can access it
      res.cookie('accessToken', accessToken, { });

      // Head back to the WDC page
      res.redirect('/index.html');
    } else {
      console.log(error);
    }
  });
});


// -------------------------------------------------- //
// Create and start our server
// -------------------------------------------------- //
http.createServer(app).listen(app.get('port'), function(){
  console.log('Express server listening on port ' + app.get('port'));
});