Appendix A - Additional Installation Instructions
In this section:
- Manually Installing and Configuring Postgres
- Uninstalling TabMon and Postgres
- Using TabMonConfigBuilder.exe To Help Build TabMon.config
Manually Installing and Configuring Postgres
Follow the steps below to manually install PostgreSQL on your system. If you already have a PostgreSQL server and just need to initialize the TabMon results database, skip to step 3.
- Download Postgres:
http://www.enterprisedb.com/products-services-training/pgdownload#windows
-
Run the installer and use the following options in the setup wizard:
-
Superuser password: your choice
-
Port: 5432
-
Locale: English, United States
-
If prompted to launch StackBuilder, choose no.
-
-
Open PGadminIII
-
Connect to your Postgres server using the postgres login account.
-
Right click on Login Roles and choose New Login Role
-
Enter the following parameters:
-
Role name: tabmon
-
Definition: Enter a password
-
Role privileges: Select “Can create databases”
-
-
Right click on Databases and choose New Database
-
Enter the following parameters:
-
Name = TabMon
-
Owner = tabmon
-
Encoding = UTF8
-
Tablespace = pg_default
-
Collation = English_United States.1252
-
Character type = English_United States.1252
-
Connection Limit = -1
-
Under privileges:
-
Give all privileges to tabmon
-
Revoke all privileges from public
-
-
-
-
Update TabMon.config
- Open up
C:\Program Files (x86)\TabMon\Config\TabMon.configand change the configured “tabmon” database user password to whatever you set in step 3.
- Open up
Note that by default, Postgres does not allow any remote connections. If you want to connect to Postgres from a remote machine, you will need to add a pg_hba.conf entry to enable it. See instructions for this at: https://www.postgresql.org/docs/current/static/auth-pg-hba-conf.html.
Uninstalling TabMon and Postgres
TabMon can be removed by simply uninstalling it through the Windows “Add/Remove Programs” interface. Application log files and CSV results are left behind and must be manually deleted.
However, in order to preserve your data, this uninstall does not automatically remove Postgres.
To fully remove Postgres:
-
Open up a console window as administrator.
-
Enter the following commands to remove the service:
sc stop TabMon-Postgressc delete TabMon-Postgres -
Delete the folder where you installed Postgres (default is
C:\Postgres).
Using TabMonConfigBuilder.exe To Help Build TabMon.config
With the release of TabMon v1.3, TabMon.Config now allows users to specify JMX ports. This means that the configuration can be more complicated to create. TabMonConfigBuilder.exe is a small utility that parses the results from tsm topology list-ports and creates the framework for a cluster in the TabMon.Config.
To run TabMonConfigBuilder.exe follow the steps below:
-
Download TabMonConfigBuilder.zip at this link: https://github.com/tableau/TabMon/releases/download/v1.3/TabMonConfigBuilder.zip.
-
Unzip TabMonConfigBuilder.zip.
-
Open a command prompt in administrator mode and navigate to the directory that TabMonConfigBuilder was unzipped into.
NOTE: Anything between
[]should be replaced with the description. -
Log into tsm on the cluster that you wish to add to the TabMon config.
tsm login -u [USERNAME] -
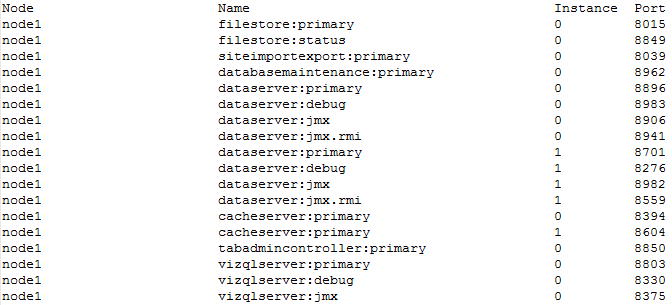
Pipe tsm topology list-ports to a file.
tsm topology list-ports > [OUTPUT_FILE] -
Run TabMonConfigBuilder with topology output and output file.
tabmonconfigbuilder [TARGET] [OUTPUT] -
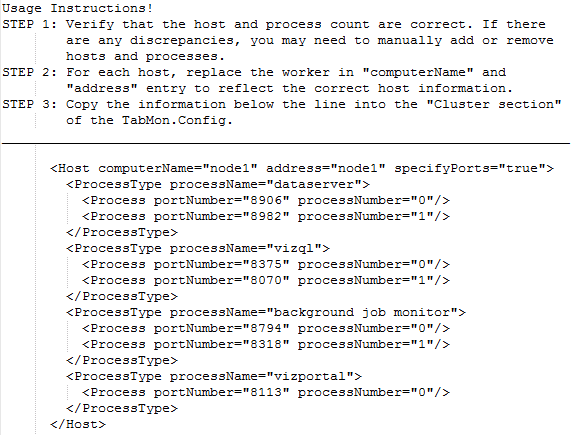
Open “output.txt” and verify that the host and process count are correct. If there are any discrepancies, you may need to manually add or remove hosts and processes.
-
For each host, replace the worker in
computerNameandaddressentry to reflect the correct host information. -
Copy the information below the line into the
Clustersection of the TabMon.Config.
File topology_out.txt output:
TabMonConfigBuilder.exe output should look something like this: