Add a Configuration Popup Dialog Box
If you want users to be able to configure settings for your extension, you can use an optional callback function when you initialize your dashboard or viz extension. The callback function creates a configuration option that can be used to open a popup window (dialog box) for your extension. The Extensions API supports different dialog box styles: modal, modeless, or window. You can use the dialog box to allow users to set and save settings for the extension. Starting with Tableau 2026.1 (and the v1.16 library), you can create multiple dialog boxes and send messages between them.
By design, there can be only one context configuration popup window or dialog box. For information about creating and using multiple popup dialog boxes or window, see Add a Multiple Popup Dialog Boxes.
Add the context menu to the .trex file
The first step is to add the <context-menu> option to the extension's manifest file (.trex). The <context-menu> element only contains one item: <configure-context-menu-item />.
- The context menu option must follow the
<icon>and<permissions>elements in the manifest file in the<dashboard-extension>or<worksheet-extension>section:
<!-- add to <dashboard-extension> or <worksheet-extension> section
  after <icon></icon>
  and <permissions></permissions> -->

<context-menu>
    <configure-context-menu-item />
</context-menu>
Create a configuration function
When you initialize an extension, you can pass an optional contextMenuCallbacks object to the initializeAsync() function.
This object maps a special ID or key (which must be 'configure') to a function you create.
-
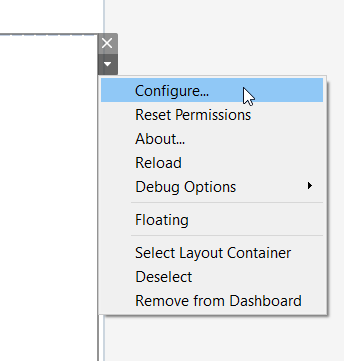
For dashboard extensions, the function you create, in conjunction with adding a
<context-menu>item to the manifest, adds a new Configure... context menu item to the zone of the extension inside a dashboard. -
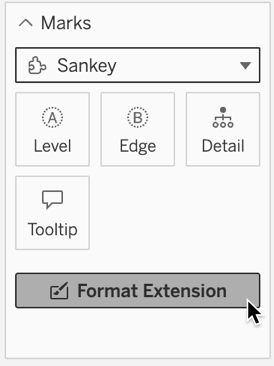
For viz extensions, the function you create, in conjunction with adding a
<context-menu>item to the manifest, adds a new Format Extension button to the Marks card.
When the user selects the context menu item, or selects Format Extensions button, the configuration function you specified is executed.
Dashboard extensions configuration menu
Viz extensions format button
For example, you could use the UI namespace and have the configuration function call the displayDialogAsync() function. The function then creates a dialog box that can be used to change settings for the extension. The parent (or initial window) for your extension might have the following JavaScript code. This example uses an initial payload string value, defaultIntervalInMin, to pass to the configuration dialog. The payload value is modified in the configuration dialog and is returned in the closeDialog() method. Alternatively, you could use a Settings object to store the key/value pairs that configure your extension.
The popupURL is the URL to your configuration window. You will need to create the HTML web page and JavaScript code for the configuration window.
// Wrap everything in an anonymous function to avoid polluting the global namespace
(function () {
const defaultIntervalInMin = '5';

$(document).ready(function () {
    // ...
    // pass the object to initializeAsync() to map 'configure' key to a function called configure()
    // ...
    tableau.extensions.initializeAsync({'configure': configure}).then(function() {
      // ...
     // ... code to set up event handlers for changes to configuration
      });
    });


   function configure() {
    // ... code to configure the extension
    // for example, set up and call displayDialogAsync() to create the configuration window
    // and set initial settings (defaultIntervalInMin)
    // and handle the return payload

    // Define the URL of the configuration popup window
    // This uses the window.location.origin property to retrieve the scheme, hostname, and
    // port where the parent extension is currently running, so this string doesn't have
    // to be updated if the extension is deployed to a new location.
    const popupUrl = `${window.location.origin}/Samples/Dashboard/UINamespace/uiNamespaceDialog.html`;
    //
    // Specify the style of dialog box: modal, modeless, or window
    let dialogStyle = tableau.DialogStyle.Modeless;
    // ...
    // initial payload string value, `defaultIntervalInMin` set
    tableau.extensions.ui.displayDialogAsync(popupUrl, defaultIntervalInMin, { height: 500, width: 500, dialogStyle }).then((closePayload) => {
      // The promise is resolved when the dialog has been expectedly closed, meaning that
      // the popup extension has called tableau.extensions.ui.closeDialog.
      // ...

      // The close payload is returned from the popup extension via the closeDialog() method.
     // ....

    }).catch((error) => {
      //  ...
      // ... code for error handling
    });
  }

})();
Create the HTML and JavaScript code for your configuration window
In the JavaScript code for the popup dialog window, add your code for initializing the dialog (initializeDialogAsync) and code for setting and saving the configuration settings. Include this JavaScript file in your HTML code for the configuration window.
  $(document).ready(function () {
    // The only difference between an extension in a dashboard and an extension
    // running in a popup is that the popup extension must use the method
    // initializeDialogAsync instead of initializeAsync for initialization.
    // This has no affect on the development of the extension but is used internally.
    tableau.extensions.initializeDialogAsync().then(function (openPayload) {
    // The openPayload sent from the parent extension, in this example, is the
    // default time interval for the refreshes.  This could alternatively be stored
    // in settings, but is used in this sample to demonstrate open and close payloads.
    // code goes here
    });
  });
In your code to close the popup window, you must pass a non-empty string value as the return payload, even if you're using the Settings object to pass your configuration parameters. For example, you could specify a string with a single blank space (" ") as the return payload.
  function closeDialog() {
   // Save the settings with tableau.extensions.settings.saveAsync()
   // Or pass the new configuration setting in the close payload
     tableau.extensions.ui.closeDialog('NewInterval');
     console.log("Settings saved");
    });
To better understand how to use the context menu or configuration window, and to see it in action, check out the UINamespace sample.