tableau-google-workspace-integration
![]()
Tableau Add-on for Google Workspaces
Summary
This document describes how to install, configure, and use the Tableau add-on for Google Workspace. The purpose of this add-on is to make it easier for end users to surface their Tableau content within Google Workspace products (Docs & Slides). Check out the release notes page for updates to this add-on.
Install the add-on
The installation process is very simple. Open the Google Workspace Marketplace and find the Tableau Add-on’s listing.
There will be an Install button, but depending on your organization’s security settings this may be greyed out. If it’s greyed out, that means your Google Workspace admin has defined an allow-list of available add-ons. Have your Google Workspace admin follow the steps here, in order to add the Tableau Add-on to the allow-list. It’s also possible for the Google Workspace admin to auto-install the add-on for users based on Google user groups.
If it is available for installation, just click the install button and then open up Google Docs or Slides in a new browser tab. Once installed, you should see a new Tableau icon in the right side-panel.
Configure the add-on
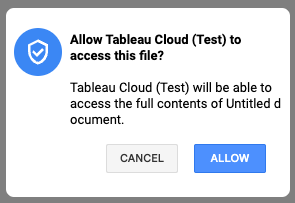
The first time you open the add-on, you will be prompted to authorize access to our add-on. The add-on needs access to your Google Drive file (Doc, Slide, etc) in order to insert/update content from Tableau.
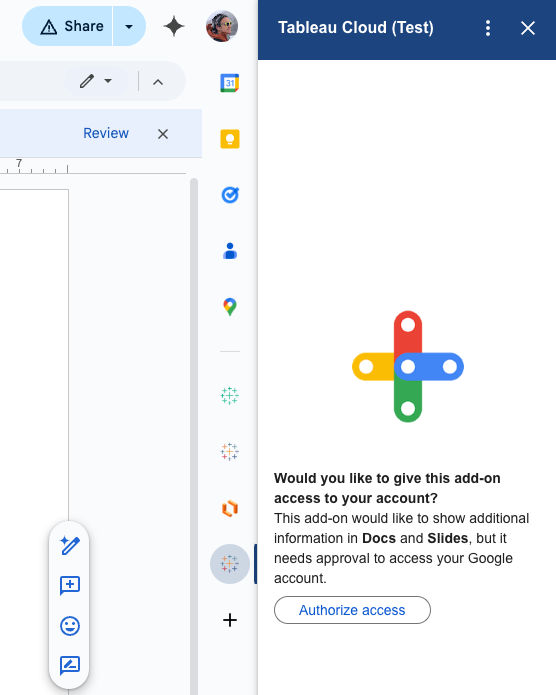
Clicking the Authorizate Access button will trigger an OAuth popup, which should outline the specific permissions required.
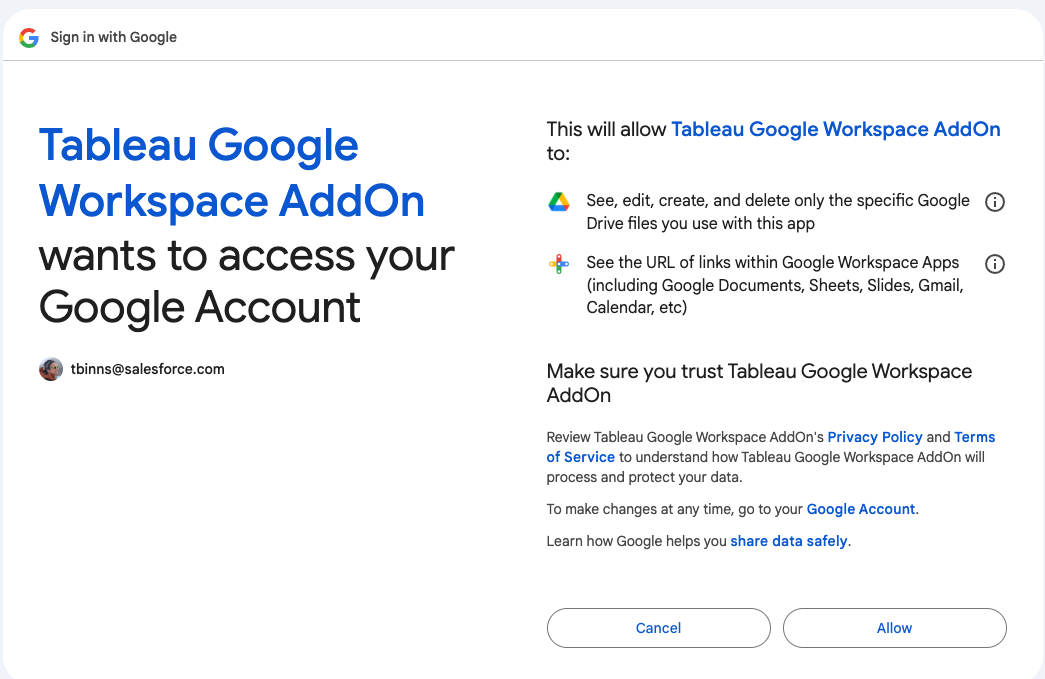
After granting access to the add-on, you will likely get one more prompt asking if the add-on can access this specific document/slide. Instead of asking for access to all the user’s Drive files, we only ask for permissions on files you want to use the add-on with.
Configure your site
The first time you open the add-on, you will get prompted to add a Site Configuration. This is where you can specify the Tableau site that you want to integrate with Google Workspace.
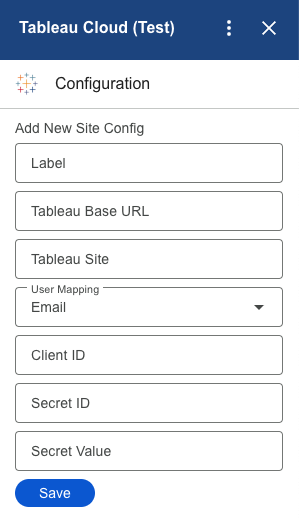
Have your Tableau admin follow the instructions here, to create a new Tableau Connected App. The Tableau connected app will allow the add-on to authenticate to Tableau, using the context of the logged in Google user. When creating the connected app, you should ignore the Access Level and Domain Allowlist options, as those are only applicable when using the Tableau Embedding API (the add-on uses the Tableau REST API exclusively). Also, don’t forget to mark the connected app as “Enabled”, since they are always disabled by default.
Then have your Tableau site admin fill out the fields below within the add-on. In order to add or remove site configs within the Tableau Add-on, we require the Google user to be a admin on the Tableau site. This is to prevent casual users from accidentally adding or deleting sites they shouldn’t.
| Property | Description |
| Label | [Optional] Friendly name for your Tableau site (uses Tableau Site, if left blank) |
| Tableau Base URL | The hostname of your Tableau environment (see below image) |
| Tableau Site | Your Tableau site name, as it appears in the URL (see below image). Note that this property is case sensitive. If using Tableau Server’s default site, leave this field blank |
| User Mapping | This dropdown specifies how to map your Google Workspace user to your Tableau username. Currently, only Email is supported. |
| Client ID | Tableau connected app’s Client ID |
| Secret ID | Tableau connected app’s Secret ID |
| Secret Value | Tableau connected app’s Secret Value |

Once you click the Save button, you will need to refresh the web page for the changes to take effect. Next time you open the Tableau Add-on, you should see a dropdown menu that contains a list of all the Sites you’ve configured.
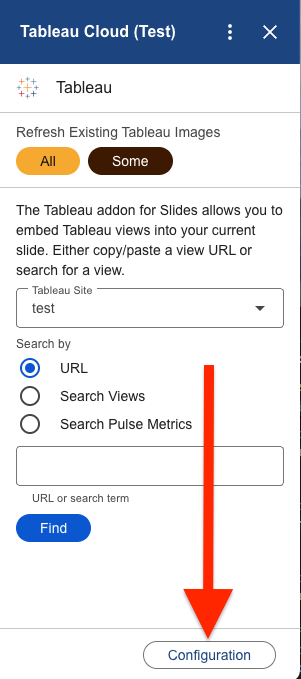
If you want to set up additional sites to work with the add-on, use the Configure button at the bottom of the add-on. This will let you manage the sites that work with the add-on.
User Guide
User Preferences
Since the add-on can be configured to work with a number of different Tableau sites, you may find yourself using the Site Selector dropdown every time you open the add-on. To save time, use the Configuration button at the bottom of the add-on to mark a site as your “Default”.
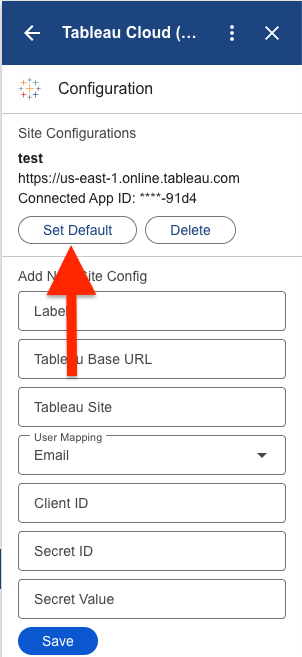
This setting is specific to your user, and will ensure that whenever you open the add-on the dropdown list will be set to your default site. Changes made on the Configuration page require reloading the web page, before they can be seen.
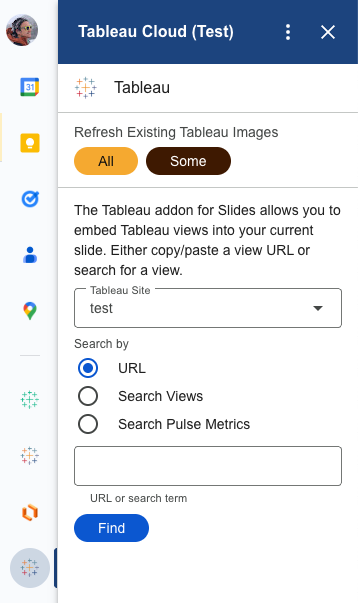
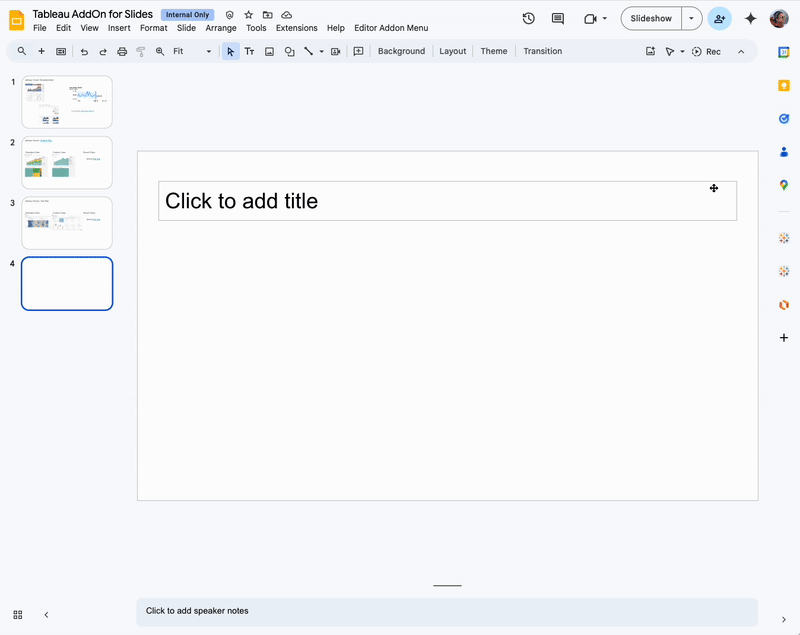
Google Slides
To use the add-on in Google Slides, look for the Tableau icon in the right side-panel. Clicking on the Tableau add-on will open the add-on’s homepage.
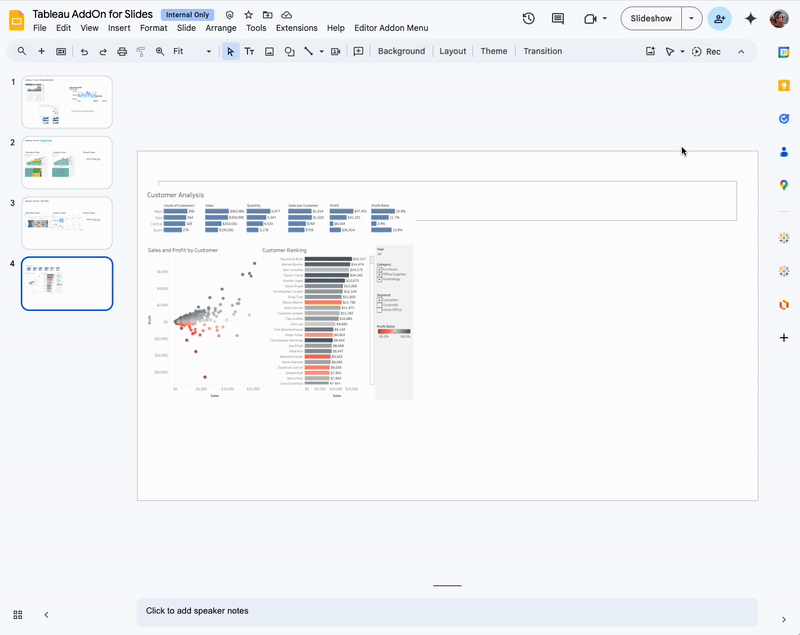
Insert Image from Tableau
The Tableau Cloud add-on allows you to embed your Tableau content as an image within a Google Slides presentation. Find the Tableau icon in the right side-panel, and select which site your Tableau content comes from. You can find content in a few ways:*
-
URL - You can copy/paste the URL to your Tableau view or Pulse metric, and the add-on will display a preview of the view/metric
-
Search Views - Enter a search term to search your Tableau site for a view. Select one of the results, to view a preview of the view.
-
Search Pulse Metrics - Enter a search term to search your Tableau site for a Pulse metric. Select one of the results, to view a preview of the metric’s trendline.The preview page will display the image that gets inserted into the slide, and prompts you to choose which slide to insert the image. Clicking the Insert button fetches the image and inserts it into the selected slide. This option does not apply to Tableau Server customers.
Refresh Image from Tableau
After inserting images from Tableau, it’s important to remember these are static images. Over time your data will change and the images will need to be updated. To refresh the Tableau content in your presentation, you can either click the Refresh All button or the Refresh Some button. Clicking the Refresh Some button will pull up a list of all the Tableau images within your spreadsheet. Check the boxes for each image you want to refresh, and then click the Refresh button. Since you may end up with many images being refreshed at once, the add-on writes the status of the refresh job as a comment on the presentation. This acts as an audit trail telling you who triggered the refresh job, when the job ran, and the status of each image we tried to refresh. You may find that some image refreshes were successful, while others were not. There’s many potential reasons for this, see the FAQ below for more potential reasons why an image refresh would fail.
Preview Links from Tableau
Any object that contains a hyperlink to a Tableau view or Pulse metric will automatically unfurl as a PreviewLink. These preview links display a preview image of the view/metric, as well as some metadata.
Note that preview links in Slides prompts you to replace the URL with a new title. Keep in mind this is a one time replacement, and changes to the view title or metric will not automatically update. This is especially noticable with Pulse metrics, since the title of the thumbnail includes the metric’s value. This is a limitation of how PreviewLinks work in Slides (smartchips are not yet supported).
Google Docs
Insert Image from Tableau
The Tableau add-on allows you to embed your Tableau content as an image within a Google Docs. Find the Tableau icon in the right side-panel, and select which site your Tableau content comes from. You can find content in a few ways:
-
URL - You can copy/paste the URL to your Tableau view or Pulse metric, and the add-on will display a preview of the view/metric
-
Search Views - Enter a search term to search your Tableau site for a view. Select one of the results, to view a preview of the view.
-
Search Pulse Metrics - Enter a search term to search your Tableau site for a Pulse metric. Select one of the results, to view a preview of the metric’s trendline.
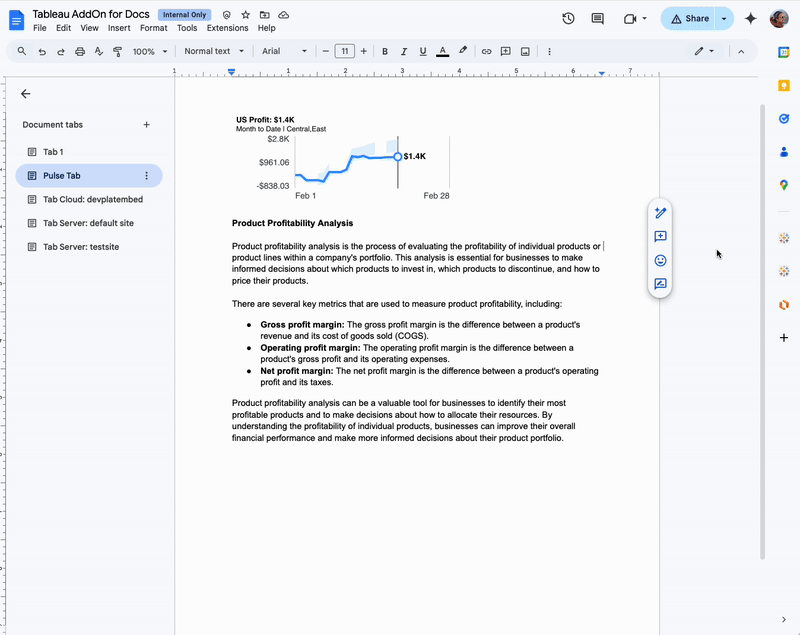
The preview page will display the image that gets inserted into the doc, and prompts you to choose which tab to insert the image. Clicking the Insert button fetches the image and inserts it at the top of the selected tab. Once the image has been added, you can move it wherever you like.
Refresh Image from Tableau
After inserting images from Tableau, it’s important to remember these are static images. Over time your data will change and the images will need to be updated. To refresh the Tableau content in your doc, you can either click the Refresh All button or the Refresh Some button. Clicking the Refresh Some button will pull up a list of all the Tableau images within your spreadsheet. Check the boxes for each image you want to refresh, and then click the Refresh button. Since you may end up with many images being refreshed at once, the add-on writes the status of the refresh job as a comment on the document. This acts as an audit trail, telling you who triggered the refresh job, when the job ran, and the status of each image we tried to refresh. You may find that some image refreshes were successful, while others were not. There’s many potential reasons for this, see the FAQ below for more potential reasons why an image refresh would fail.
Smartchips from Tableau
Any object that contains a hyperlink to a Tableau view or Pulse metric will automatically unfurl as a Smartchip. These smartchips display a preview image of the view/metric, as well as some metadata.
FAQ
Does this add-on work for both Tableau Cloud and Server?
Yes, this add-on supports both Tableau Cloud and Tableau Server (version 2023.3 and newer).
For Tableau Server customers, the PreviewLink and Smartchip features are not available. This is because Google Workspace add-ons are required to set a global allowlist for URLs to match. Tableau Cloud is easy because all URLs begin with https://<pod-name>.online.tableau.com. However, each customer will have unique URLs to their Tableau Server environments and there’s no way to dynamically set this allowlist.
Additionally, Tableau Server customers will need to ensure our add-on can communicate with your Tableau Server. Many customers lock down their Tableau Servers behind a firewall/VPC to prevent public access. If this is the case, you will need your network security team to add a ingress rule allowing traffic from our add-on. Our add-on is hosted at https://addon.googleworkspaces.tableau.com which corresponds to a static IP address 34.173.205.92:443, so use that for the allow-list rule.
What data is stored on the app?
In terms of what data is shared, we can differentiate between data shared with our app vs data that is persisted in Google Docs/Slides:
-
Our application in a Salesforce-owned GCP project will store:
-
Site Config Details - The details required for our add-on to authenticate your users to Tableau. This includes the URL and site name of your Tableau site, as well as the connected app details (client id, secret id, secret value)
-
User Preferences - When you select a site as “default”, we store that selection in a database.
-
Telemetry - We log activities within the app, such as a user opening a dashboard named X. No actual data is logged, just metadata from Tableau.
-
-
What gets stored within Google Docs/Slides:
- Images - when you embed a view or metric in a Google Doc/Slide, we just insert a static image. This is similar to if a user took a screenshot of a dashboard and pasted it into a Doc.
As for permissions, this is laid out in the app’s marketplace listing (as well as when they go to do the install). We need access to the end user’s profile data, so we know how to authenticate them to tableau server/cloud. We also need access to the individual files used with the add-on, in order to insert/refresh the Tableau images.
Are the images live or static?
All images within Google Workspace are static. Google does not allow embedding live content (iframes), so it’s not possible for any 3rd party to embed a live interactive dashboard. All images are snapshots of what the view/metric looked like when it was inserted into the Doc/Slide.
What happens if I cut/copy and paste a Tableau-generated image?
TL/DR - Copies of the image will also be available for refreshing
Detailed answer: When a user embeds a Tableau image (view or metric) into a Doc or Slide, we also add a hyperlink to the tableau content. This is how we track which images came from the Tableau add-on vs any other regular image. As a result, this also means if you remove the hyperlink from the images manually, they will no longer be able to be refreshed.
How does authentication work?
When the add-on is first installed, we prompt the user to configure it with a Tableau Cloud/Server site. This configuration uses Tableau Connected Apps to provide a single-sign-on experience for the customer. Once the add-on is configured once, all other users for that customer can leverage that configuration and will not be prompted to sign in to Tableau. When a user opens the Tableau add-on, we get some information about that user from the Google APIs. We take their email address, and use that to authenticate to Tableau Cloud/Server in order to make REST API calls. So whenever a user searches for a view/metric or generates an image, we’re mapping their Google identity to a Tableau username and using that to ensure Tableau permissions are applied.
What if the customer’s Google email doesn’t match their Tableau username?
Our initial launch for this add-on will require the Google email to match their Tableau username. However, we understand that this will be a problem for many Tableau Server customers. It’s a bit challenging, as their Tableau usernames may not exist in Google Workspace at all. It’s possible for Google Workspace admins to create custom user attributes, so this will likely be the future approach. However we still need to figure out how to query for those custom user attributes from our add-on.
Does this support custom views?
Yes, if you copy/paste the link to a custom view in the add-on it will work the same as any other view.
What kind of URLs are supported?
URLs that link to views, custom views, and Pulse metrics are supported. One exception is URLs obtained by right clicking on a view link in Tableau. These tend to have a URL pattern like https://<pod-name>.online.tableau.com/#/site/<site-name>/redirect_to_view/<some-number>. Unfortunately, there is no way to determine what view this is based on that number. Instead, open the view in your web browser and get the view URL from the browser window.
Trying to configure Tableau Server, but getting an error like “Could not communicate with Tableau Server at xxx”?
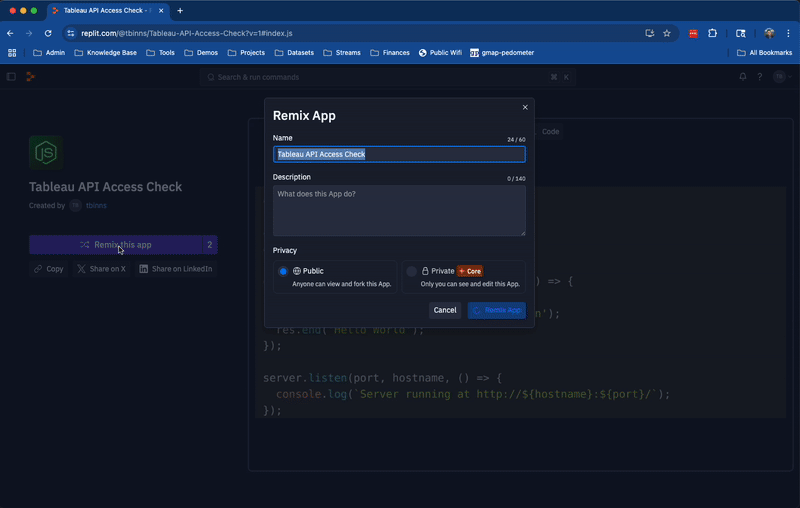
This error message occurs when our Google Workspace Addon can’t reach your Tableau Server. Generally, this is a network access issue where our addon makes an API call but it never makes it to the Tableau Server. There are many potential reasons this occurs (firewall/VPC preventing access, lack of valid SSL Certificate, etc), which can make it difficult to troubleshoot. If you’re getting stuck with this, try using the below tool. It’s some sample code that takes your inputs (config.js) and tries to authenticate to your Tableau Server. If there’s an issue connecting, it will show additional details as to why the connection failed.
To use this tool, you will need a free Replit.com account. Once you’ve signed up for a free account, use this link to “Remix the app”. This creates a separate version of the app just for you. Edit the config.json file to include the details of your Tableau Server, and click the green RUN button. The output should give you a bit more information as to why the authentication attempt is failing. Just remember that free Replit projects are public, so delete them when you have completed your testing.